
Newly Created Assemblies Are Renaming Old Assemblies
This topic is very popular for drafters that are using Revit families. Anyone using Fabrication Part ITMs will not experience this issue. Although this issue may be a tough one to get around, we have a solution that requires just a little back story.
Here’s what’s going on…
Selecting material and creating assemblies where the selected components are similar to previously created assemblies gives Revit the OK that these assemblies should be named the same. This presents a problem when you’re naming your spools with a System Name or a Floor Number or any other defining information. Spools on different systems, floors, and sequences will now have the same name as your newly created assembly.
Even worse, when creating Assembly Sheets for fabrication, each of the spools will all share one sheet. Sometimes this is the desired result as many distribution piping systems will have “typical” spools as they are referred to in the industry. If that is your desired result, you can stop reading here, put your feet up, and congratulate yourself on a job well done. For the rest of us, keep reading.
Heres’ what we can do about it…
Using the Victaulic Tools Create Assembly button gives us the opportunity to add more data into our Family Instances while we create these spools. The data we inject into these Family Instances needs to be definitive enough for Revit to consider the selected component to be different and create new Assemblies. We’re going to use the Victaulic Shared Parameters file and the Family editor to accomplish this.
- First, identify a family that will be present in the majority of your Assemblies. (Sometimes this is a coupling, a weld, a flange, and if all else fails an elbow family.)
- Double click the family to edit or select Edit Family in the Modify Ribbon.
- In the upper left corner, click the Family Types button.
- Now, we want to add a parameter from the Victaulic Shared Parameters file. Click New Parameter.
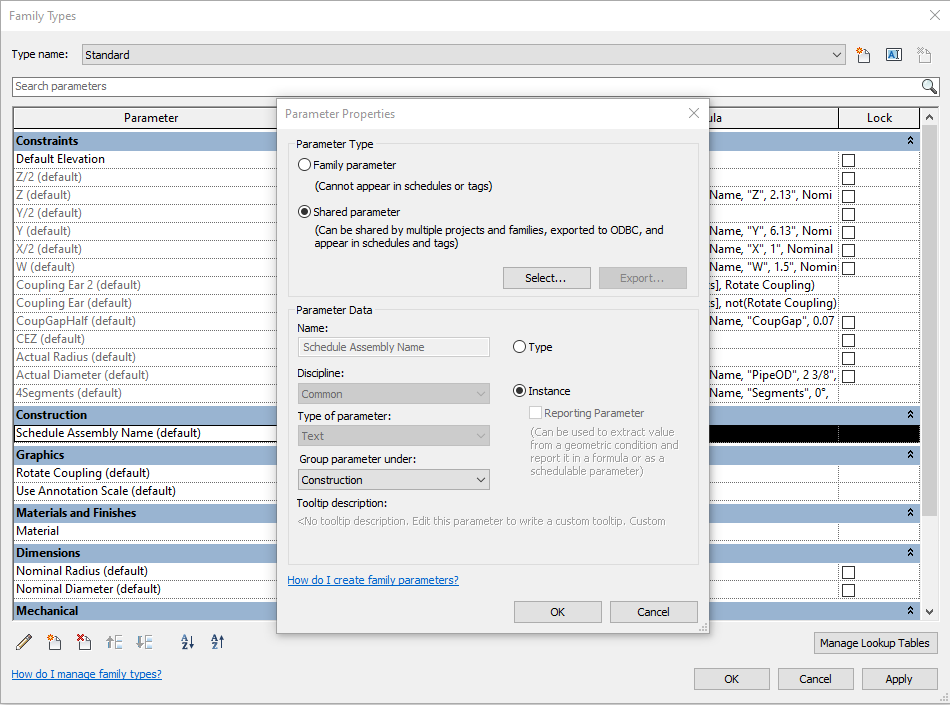
- Change the Parameter Type to Shared parameter and click Select…
- Locate the Victaulic Shared Parameters file and click Open.
- Change the Parameter Group to Construction and select the parameter called Schedule Assembly Name. (Revit may ask you to do this twice.)
- Be sure to mark this parameter as an Instance Parameter and click OK.
- Load the family back into your project.
The parameter properties should look like what you see below. Notice in the Construction area of the Family Types dialog, you see Schedule Assembly Name (default). If the (default) is missing, you may have selected Type in the previous screen.
Now that your family has the Schedule Assembly Name parameter, Victaulic Tools Create Assembly will automatically populate that with the unique name of the assembly being created. This is enough for Revit to know that this Assembly is different than all the others and the renaming of previous assemblies will stop.